Getting Started
Introduction & Prerequisites
Setting up Shion.app to control your environment is a multi-step process. This page will go through those steps and you should end up with a functional system by time you finish following these instructions.
To begin, you should have a few elements handy. You will need your home automation hardware ready (please see Compatible Devices if you need guidance selecting the right devices), your Mac connected to the Internet, and about 15 minutes for this process.
If you are ready, let’s get started!
Step 1: Install your controller.
Find the controller that you will be using and plug it into a wall socket near the Mac where you will be running Shion.app. Ideally, the controller should be plugged directly into a wall. Using power strips or surge protectors may degrade the controller’s ability to communicate with other devices.
Once the controller is plugged in, connect it to your Mac using any cables that accompanied the device. If you are using a USB controller, connect it directly to your Mac. Past experience shows that hubs and other intermediate devices may interfere with the reliability of the controller.
Once the controller is connected to both a power outlet and your Mac, note the type of the controller, as we will need this information for configuration later on.
Step 2: Set up your devices.
Please install any lamp, appliance, or other device modules as instructed by the accompanying documentation. As you install the devices, please write down the address of each device and a descriptive name that you can use later to identify it.
If you are using Insteon modules and have a pair of wireless access points, please install them now as per the included instructions. If you do not have any access points, we strongly encourage your to acquire at least two, as these modules will dramatically improve the reliability of your local home automation network.
If you are using Insteon modules, you should link each device that you install to your controller. While the specific steps for linking the devices varies by type, the typical process goes as follows:
- Put the controller in linking mode. On some controllers, this can be done by holding down the SET button for 10 seconds and then releasing. If the light on the controller blinks repeatedly, it is ready to link.
- Find the target module and place it in linking mode as specified by the accompanying instructions. Typically, this involves holding down a SET button on the device for a few seconds.
- Once the two devices are ready to link, they will find each other on the local network. Once a successful link has been established, the lights on the controller and device module will stop blinking and return to a dim solid glow. If your devices do not link, you may need to install additional access point modules to improve the connection between the two.
- Repeat steps 1-3 for each device that you want to control.
While the linking process can be tedious for several devices, linking each device to the controller allows the controller to receive announcements from the device about state changes. For modules like lamps and appliances, these messages tell the controller when the device is turned on or off, while for devices like motion sensors, these messages tell the controller when something is sensed. This 2-way communications is the heart of any Shion installation.
Step 3: Download and install Shion.
Before you download Shion, please check the model of your controller. If you are using a USB PowerLinc 2412 or a USB PowerLinc 2413, you must download and install the FTDI VCP serial port drivers. Select the Mac OS X package for your system and install the drivers as directed.
If you are using a serial port controller (PowerLinc 2412/2413, CM11a), please verify that you have installed the appropriate drivers for the serial port interface that you are using. The Keyspan devices are popular choices.
If you are using a PowerLinc 2414 or CM15A controller, Shion.app includes built-in support for these devices and no additional software is required.
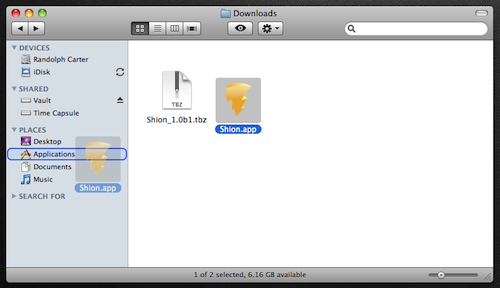
Once you have installed any prerequisite software, download the most recent version of Shion from the web. After downloading Shion.app, uncompress the file by double-clicking it, and drag the program to your Applications folder.
Once Shion.app is in your Applications folder, double-click it to run it.
One thing that you will notice is that while Shion readily displays its Console window, there is no icon in the Dock. Since Shion is intended to run in the background continuously, it does not clutter your Dock with a deedicated icon. Rather, you can access Shion from the lightning bolt in the status area as shown below.
Step 4: Setting up your controller.
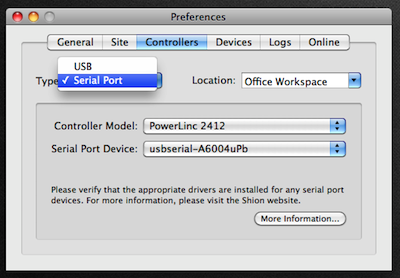
To start configuring Shion, the first thing you need to do is set up the controller. From the status menu, select “Preferences”. When the window appears, select “Controllers”.
If you did not need to install any additional software, you are using a USB controller. Select the USB option from the pulldown and select the kind of controller you are using.
If you are using a serial port controller or needed to install additional drivers, you are using a Serial Port controller. Select this from the pulldown, and your controller type from the “Controller Model” pulldown. Then, select the proper serial port that the device is using. If you are using a PowerLinc 2412 or 2413 device, the right option will look something like usbserial-A6004uPb. If you are using a Keyspan serial port, the right option will look something like USA19H1a2P1.1.
Once you’ve configured your controller, quit Shion from the status menu and restart it from the Applications folder. Your controller is ready for use.
Step 5: Setting up devices.
To add a new device, click the + button in the bottom left of the Console window.
Navigate through the menu to find the kind of device module that you want to set up.
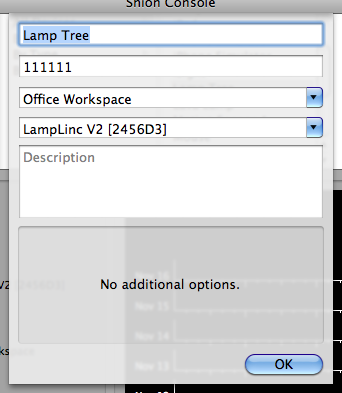
When you select the module, a dialog will appear that asks you for some information.
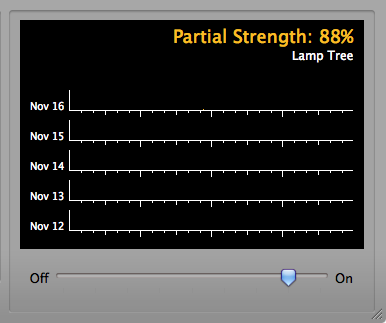
Input the descriptive name and device address from step 2. Add a location, and feel free to leave the Device Model empty. (Shion can get that information from the device.) Click OK and the dialog will disappear and you should see controls in the bottom-right section of the Console window. Try controlling the device. If the device responds to your commands, you have set it up successfully.
If not, verify the following:
- You’ve entered the proper device address.
- You’ve selected the proper device type. Note that the term “appliance” only means that a device can be turned on or off. “Lamp” indicates that the device can be brightened or dimmed. It is quite common to use “appliance” modules to control lamps.
- If the two items above are correct, please verify that you’ve set up the right kind of controller and the serial port address is correct (if relevant). Don’t forget to restart Shion after changing the controller configuration.
If none of these steps work, please get in touch with support (shion@audacious-software.com) and we will assist you.
After you have set up your first device, repeat this process for each other device in your environment.
Next Steps
Once your devices are setup and you can control them with Shion.app, you’re ready to learn more about the next major feature: Using Snapshots.


